* 요 약 *
1. 준비사항
2. Dependent ROS Package 설치
3. Turtlebot3 Package 설치
4. 네트워크 구성
* 참 고 *
- 참고사이트 : Turtlebot3 e-Manual https://emanual.robotis.com/docs/en/platform/turtlebot3/quick-start/#pc-setup
ROBOTIS e-Manual
emanual.robotis.com
1. 준비사항
1-1. Ubuntu 설치
- https://sh-ido.tistory.com/2 참고하여 설치
1-2. ROS 설치
- https://sh-ido.tistory.com/3 참고하여 설치
2. Dependent ROS Package 설치
sudo apt-get install ros-noetic-joy ros-noetic-teleop-twist-joy \
> ros-noetic-teleop-twist-keyboard ros-noetic-laser-proc \
> ros-noetic-rgbd-launch ros-noetic-rosserial-arduino \
> ros-noetic-rosserial-python ros-noetic-rosserial-client \
> ros-noetic-rosserial-msgs ros-noetic-amcl ros-noetic-map-server \
> ros-noetic-move-base ros-noetic-urdf ros-noetic-xacro \
> ros-noetic-compressed-image-transport ros-noetic-rqt* ros-noetic-rviz \ ros-noetic-gmapping ros-noetic-navigation ros-noetic-interactive-markers
* \ : 원래 명령어 입력 후 Enter를 누르게 되면 입력한 명령어가 바로 실행이 되는데, \ 입력 후 Enter를 누르면 바로 실행되지 않고 한꺼번에 명령어 입력 가능 (터미널에서는 원화표시 말고 백슬래쉬 모양으로 표시됨)

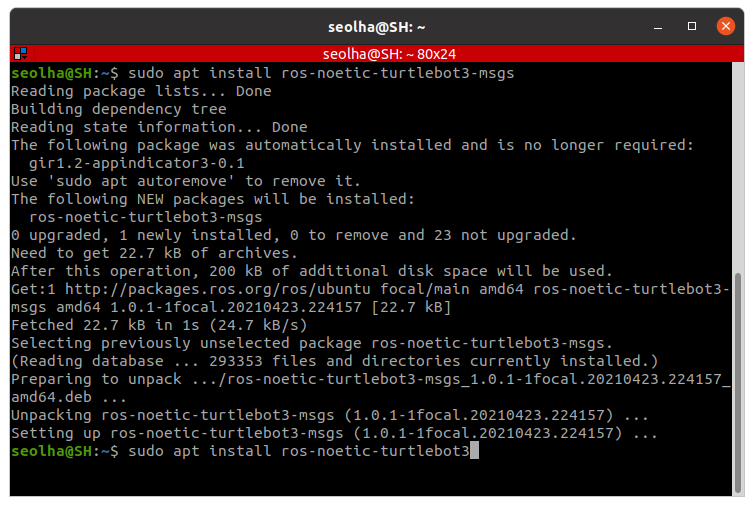
3. Turtlebot3 Package 설치 (Turtlebot이 아닌 노트북 또는 데스크탑에 설치!)
3-1. Debian Packages를 통한 Turtlebot3 설치
sudo apt install ros-noetic-dynamixel-sdk

sudo apt install ros-noetic-turtlebot3-msgs

sudo apt install ros-noetic-turtlebot3
3-2. 소스 코드로부터 Turtlebot3 Package를 빌드하는 경우
3-2-1. 동일한 패키지 제거
- 3-1을 이미 실행했다면 중복을 방지하기 위하여 동일한 패키지를 제거해야 함
sudo apt remove ros-noetic-dynamixel-sdk
sudo apt remove ros-noetic-turtlebot3-msgs
sudo apt remove ros-noetic-turtlebot3
3-2-2. 디렉토리 생성
3-2-2-1. 디렉토리 생성
mkdir -p ~/catkin_ws/src

* mkdir : make directory의 약자. 디렉토리를 생성할 때 쓰이는 명령어.
- 기본형태 : mkdir [옵션] [디렉토리명]
* -p : 디렉토리 생성 시 작성하는 옵션 중 하나. --parents의 약자로, 생성하려고 하는 디렉토리의 상위 경로도 함께 생성해줌.
* ~/catkin_ws/src : catkin_ws 이라는 상위 경로 밑에 src 라는 이름을 가진 디렉토리 폴더를 생성하고자 함
- catkin_ws : ROS 작업 환경이며 Catkin Workspaces 이라고 함. 여러개의 패키지를 동시에 만들 수 있는 저장공간을 제공함.
- src : source의 약자.
3-2-2-2. src파일안에 생성하기 위해 src로 이동
cd ~/catkin_ws/src/

3-2-3. 특정 branch 복제하기
- Git 저장소에서 branch 전체가 아닌 특정한 branch만 복제
git clone -b noetic-devel https://github.com/ROBOTIS-GIT/DynamixelSDK.git

git clone -b noetic-devel https://github.com/ROBOTIS-GIT/turtlebot3_msgs.git

git clone -b noetic-devel https://github.com/ROBOTIS-GIT/turtlebot3.git

* 기본형태 : git clone -b (또는 git clone --branch) [태그] [Git 저장소 URL]
* 특정 브랜치나 태그만 복제하여 소스코드 탐색을 하는 경우 편리하게 사용 가능
3-2-4. catkin_ws 내 소스코드 빌드하기
cd ~/catkin_ws && catkin_make

* cd ~/catkin_ws : catkin workspace로 이동
* && : 동시에 수행
* catkin_make : catkin_ws 내의 src 폴더를 찾아 빌드 진행 (이 작업 후에는 catkin_ws 하위 경로에 build 폴더가 생성됨)
3-2-5. bashrc에 설정 저장
echo "source ~/catkin_ws/devel/setup.bash" >> ~/.bashrc

* 새로운 쉘 스크립트(shell script, 쉽게 생각하면 터미널)가 사용될 때마다 자동으로 /catkin_ws/devel/setup이라는 것을 계속 실행해주겠다는 뜻
- 현재 쉘(터미널)에서만 적용하고 싶다면 아래 내용으로 작성
source ~/catkin_ws/devel/setup.bash
* vs code를 설치했다면 code ~/.bashrc 라는 명령어를 이용하여 bashrc 를 실행하여 큰따옴표("")안의 내용을 직접 적어줘도 됨
* bashrc : 환경변수, 설정 등을 담을 수 있는 파일. 여기서 미리 ROS에 대한 설정을 해두면 실행 시에 따로 입력할 필요가 없어 편리함
* devel : 패키지를 시스템에 설치하기 전, 빌드된 실행 파일과 라이브러리들이 저장되는 곳
* shell : 명령어와 프로그램을 실행할때 사용하는 인터페이스. 깊게 들어가지 않는다면 지금까지 계속 사용해왔던 터미널이라고 생각해도 무방 ( 자세한 정보를 알고싶다면 : https://jhnyang.tistory.com/57 참고 )
4. 네트워크 구성

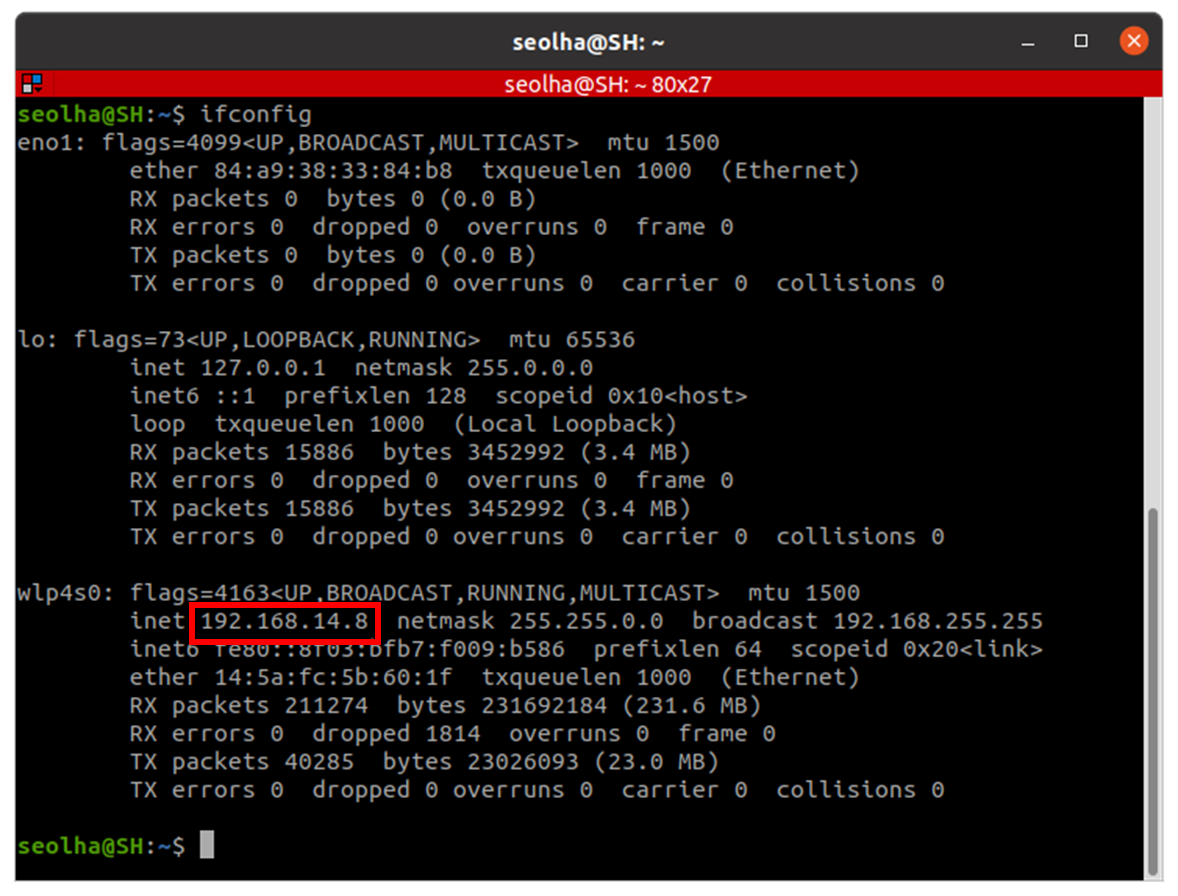
4-1. Wi-fi 연결 후 IP 주소 확인
ifconfig

※ Command 'ifconfig ' not found 인 경우
- sudo apt install net-tools 명령어 입력하여 설치
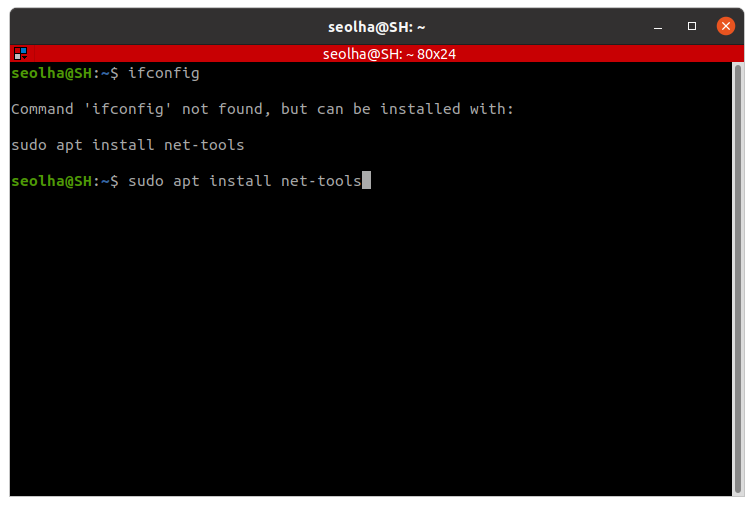
- 설치 완료 후 다시 ifconfig 입력
4-2. bashrc에 설정 저장
4-2-1. bashrc 파일 열기
방법 1) 터미널에서 수정
nano ~/.bashrc

4-2-2. bashrc 파일 수정
export ROS_MASTER_URI=http://192.168.14.8:11311
export ROS_HOSTNAME=192.168.14.8


source ~/.bashrc

방법 2) 편집기 열어서 수정
code ~/.bashrc
방법 3) 편집기 열어서 수정
gedit ~/.bashrc
4-2-3. 변경사항 확인
code ~/.bashrc

